Documentation
Get Started with 2DFS
In the Dodcs section you will find all the information you need to get started with 2DFS, including how to build your first 2DFS image, push it to a registry, and pull it from a registry.
If you’re not familiar with 2DFS, we recommend starting with the What is 2DFS? page to understand the basics of the technology.
1 - Getting Started
Start using 2DFS for the first time
In this Get Started guide you will learn:
- How to build your first 2DFS image. link
- How to push your first 2DFS image to an
OCI+2DFS compliant registry. link - How to pull your first 2DFS image partition from an
OCI+2DFS compliant registry to Docker. link
1.1 - Build your first 2DFS image
Install the TDFS CLI builder and create your first 2DFS image.
tdfs Image Builder
tdfs is a command-line tool that allows you to create and manage 2DFS images. It is designed to be simple and easy to use. All you need to do is install the utility, create your 2dfs.json descriptor file, and run the tdfs build command to create your first 2DFS image.
Installation
You can install the latest stable TDFS CLI builder using the following command:
curl -sfL 2dfs.github.io/install-tdfs.sh | sh -
Your first 2DFS image
Create your first 2DFS image by creating a 2dfs.json descriptor file in the current directory.
For example, let’s create two simple files and add them to the 2dfs.json descriptor file:
Create two sample files in the current directory:
touch file1.txt file2.txt
Now let’s create a 2dfs.json descriptor file with the following content:
{
  "allotments":[
 {
      "src":"./file1.txt",
      "dst":"/file1.txt",
      "row":0,
      "col":0
 },
 {
      "src":"./file2.txt",
      "dst":"/file2.txt",
      "row":0,
      "col":1
 }
 ]
}
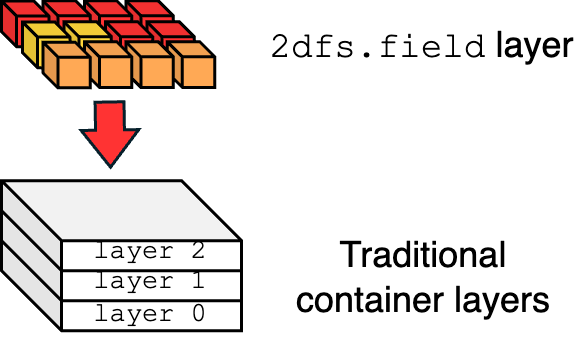
This descriptor creates two allotements, one for each file, and places them respectively in the first row, columns 0 and 1 of the 2dfs.field layer.
Once the 2dfs.json descriptor file is created, you can run the tdfs build command to create your first 2DFS image. In this example, we’ll start from a ubuntu:22.04 base image:
tdfs build ubuntu:22.04 myfirsttdfs:v1
This command will build a 2dfs.field layer on top of the ubuntu:22.04 base image, for each supported architecture (amd64, arm64, etc.), and create a new 2DFS image named myfirsttdfs:v1. The 2dfs.field layer will contain the two files you specified in the 2dfs.json descriptor file.
Optimize your build for specific OS/Architecture combinations
To build an image specific for an OS/Architecture combination, please use the --platforms flag. E.g., tdfs build --platform linux/amd64,linux/arm64 ubuntu:22.04 myfirsttdfs:v1
If the build is successful, you can now check the new 2DFS image by running the following command:
The output should look like this:
Url                               Tag    Type      Reference
---------------------------------------------------------------------------------------------------------
0  docker.io/library/ubuntu:22.04    22.04  OCI       12fac12bf3f369441a389d8947acc9c7a81bfd018e24aa8fedc0407845f59b87
1  docker.io/library/myfirsttdfs:v1  v1     OCI+2DFS  9e376e53b46e6c7ce79c3a8b5cd73382db345e3b410fce8ae62b2f3e54c7d149
You should see both the base image and the new 2DFS image in the list, one with the OCI and the other with type OCI+2DFS.
Note
Check all the available commands using tdfs -h1.2 - Create and use your 2DFS Image Registry
Install the TDFS CLI builder and create your first 2DFS image.
The 2DFS Image Registry is a container registry that supports OCI and OCI+2DFS images.
It is built on top of the OCI Distribution Specification.
Deploy the 2DFS Image Registry as a container
Use Docker to deploy the 2DFS Image Registry as a container:
docker run -d -p 5000:5000 --restart=always --name 2dfs-registry ghcr.io/2dfs/2dfs-registry:edge
This will create the registry and expose it on port 5000.
For more details and configuration options, refer to the 2DFS Registry GitHub Repository.
Push your first 2DFS image to your registry
Assuming the registry is running locally (address 0.0.0.0:5000), let’s build a simple 2DFS image and push it to your registry.
tdfs build ubuntu:22.04 0.0.0.0:5000/test/myfirsttdfs:v1
With this command, we created an image named myfirsttdfs belonging to the repository test of the registry 0.0.0.0:5000, tagged with v1.
The output of tdfs image ls should look like this:
Url                               Tag    Type      Reference
---------------------------------------------------------------------------------------------------------
...
12  0.0.0.0:5000/test/myfirsttdfs:v1  v1     OCI+2DFS  9e376e53b46e6c7ce79c3a8b5cd73382db345e3b410fce8ae62b2f3e54c7d149
Now we can push the image to the registry:
tdfs push 0.0.0.0:5000/test/myfirsttdfs:v1
This command will push the myfirsttdfs:v1 image to the test repository of the registry 0.0.0.0:5000.
1.3 - Retrieve 2DFS Images from Docker
Use Docker to pull 2DFS images from an OCI+2DFS registry.
When using a local registry, you need to configure Docker to trust the local insecure registry.
To do this, use the following configuration for your Docker daemon configuration file (usually located at /etc/docker/daemon.json):
{
    "features": {
        "containerd-snapshotter": true
 },
    "insecure-registries": [
        "<your-registry-host>:5000"
 ]
}
Replace <your-registry-host> with the hostname or IP address of your registry.
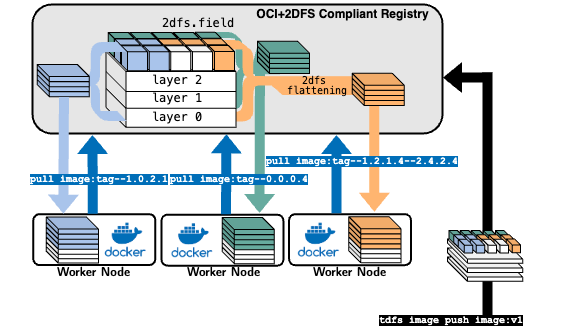
To retrieve a 2DFS image from a Docker registry, you can use the docker pull command. This command allows you to download images from a registry that supports the OCI+2DFS format.
Additionally, you can use a semantic tag in the form --<row from>.<col from>.<row to>.<col to> to define the partition of the image you want to pull.
Let’s say we pushed to our registry an OCI+2DFS image with 2 rows and 2 columns, like this:
| Row/Col | Col 0 | Col 1 |
|---|
| Row 0 | file1.txt | file2.txt |
| Row 1 | file3.txt | file4.txt |
If we want to pull the first element of the first row (file1.txt), we can use the following command:
docker pull <your-registry-host>:5000/test/myfirsttdfs:v1--0.0.0.0
To retrieve the entire image as OCI image, you can use the following command:
docker pull <your-registry-host>:5000/test/myfirsttdfs:v1--0.0.1.1
To retrieve all elements except for file3.txt, you can use the following command:
docker pull <your-registry-host>:5000/test/myfirsttdfs:v1--0.0.0.1--1.0.1.1
As you can see, semantic tags for partitions can be concatenated.
2 - Concepts
What is 2DFS and how does it work?
2.1 - What is 2DFS?
What is 2DFS and what is so special about it?
 2DFS is a two-dimensional filesystem build and distribution framework for containers.
What is 2DFS?
An extension of the container layered structure with a new two-dimensional filesystem layer type, specifically designed for efficient handling of large data.
2DFS is composed of:
- A new container layer type:
2dfs.field - A 2DFS builder, to build a
2dfs.field on top of a regular OCI container image - A 2DFS Registry, to host and distribute
2dfs and OCI compliant images. - A 2DFS flattening technique, allowing 2DFS images to be pertitioned on demand and distributed as traditional OCI images for ANY runtime.
Features
- 2DFS Builder: A tool to build 2DFS images from OCI images, with a focus on large data handling. Build performance up to 50x faster than Docker for large data.
- 2DFS Registry: A registry to host and distribute 2DFS images. It allows image partitioning via semantic tags, enabling on-demand retrieval of only the required data. This is particularly useful for large datasets, AI model partitions, drivers, and other large data files.
- 2DFS Flattening: A technique to flatten 2DFS images into OCI images, allowing them to be distributed as traditional OCI images for any runtime. This enables the use of 2DFS images in your pre-existing infrastructure, without the need for any changes.
- Image Partitioning via Semantic Tags: 2DFS images can be partitioned using semantic tags, allowing you to pull only the required data from the registry. This is particularly useful for large datasets, AI model partitions, drivers, and other large data files.
2.2 - The 2DFS container layer
What is 2DFS and what is so special about it?
2dfs.field is a new layer type that we place on top of a regular OCI container image.
The field is composed of allotments, each positioned in a specific row and column.
Definition
A field is a sparse hash-pointer matrix of allotments representing a self-contained, non-overlapping, and independent filesystem space.Each allotment can contain one or more files or, for instance, a split of a neural network, a binary file, a driver, or any other large data file.
Ok but why?
The two-dimensional shape improves build and cache performance by relaxing vertical dependencies across layer changes, and most importantly, it is a human-friendly way to organize the space. In fact, we can retrieve specific rows and columns of the field from a container image, allowing us to pull only the data we need, when we need it.Instead of creating a new container layer to place a file using the ADD primitive of the Dockerfile, we create a descriptor called 2dfs.json that places each file (or a set of files) into a row and a column of the field.
For example, this 2dfs.json descriptor file:
{
  "allotments": [
 {
      "src": "./file1.txt",
      "dst": "/file1.txt",
      "row": 0,
      "col": 0
 },
 {
      "src": "./file2.txt",
      "dst": "/file2.txt",
      "row": 0,
      "col": 1
 },
 {
      "src": ["./file3.txt", "./file4.txt"],
      "dst": ["/file3.txt", "/file4.txt"],
      "row": 1,
      "col": 0
 },
 {
      "src": "./file5.txt",
      "dst": "/file5.txt",
      "row": 1,
      "col": 1
 },
 {
      "src": "./file6.txt",
      "dst": "/file6.txt",
      "row": 2,
      "col": 1
 }
 ]
}
Will create a field like this:
| Row/Col | Col 0 | Col 1 |
|---|
| Row 0 | file1.txt | file2.txt |
| Row 1 | file3.txt,file4.txt | file5.txt |
| Row 2 | | file6.txt |
The benefits?
- If I update file1.txt, the cache will preserve all the other allotemtns, boosting the image build. No cache invalidation happening.
- If I want to retrieve only file1.txt, I can only pull column 0 of row 0, and I will get only that file.
- We can create partitions by drawing a rectangle on the field, and retrieve only the files we need. For example, if I want to retrieve file1.txt and file2.txt, I can pull the rectangle defined from row 0 and column 0 to row 0 and column 1, and I will get only those two files.
- Since the field is a sparse matrix, we can have empty rows and columns which don’t decrease the performance of the image build and retrieval, and don’t consume space in the image.
2.3 - Deep Dive into 2DFS
Want to know more about 2DFS? Read our paper!
Read more about 2DFS
We published a paper at USENIX ATC 2025 that dives deep into the design and implementation of 2DFS.